Reversi tutorial
Introduction
In this tutorial, you will build a complete, working Reversi game on BGA Studio.
If you haven't already, read the rules of Reversi so you know what we are talking about!
Compare with the production version
If you get stuck and need the source code, you can get read-only access to the Reversi project on the Studio projects page. Select Already published to see the production project. There will be some small differences, as we simplified the tutorial version.
JavaScript or TypeScript
If you're not familiar with TypeScript, we recommend following the JavaScript version of this tutorial.
If you're more comfortable with TypeScript than plain JavaScript, you can follow the TypeScript version.
Any differences between the JavaScript and TypeScript versions will be shown like this:
I want to stick to JavaScript!
Typing for the win!
Set up a version control repository
It's best to keep a history of your changes right from the start. If we break something by mistake, we can easily go back to the last committed version.
For this tutorial, we will use a local Git repository. For a real project, it would be safer to keep a copy in a remote repository too.
First, create a .gitignore file so we don't commit the credentials in the .vscode folder. We will also add node_modules for those working with TypeScript.
Then run:
We now have a local Git repo ready! After each step of this tutorial, we will commit the changes.
Using TypeScript (or not)
You can delete the src-disabled folder, tsconfig.json and rollup.config.mjs. Remember, we committed them, so you can always recover these files if you change your mind.
Rename src-disabled to src. Run npm i to install the dependencies in node_modules. The package.json file is already set up. If you configured the Run on Save extension correctly, Game.js should update automatically whenever you save Game.ts.
Whenever the tutorial mentions modules/js/Game.js, edit src/ts/Game.ts instead.
The Empty game project is the skeleton used to generate new projects. You can get read-only access to it if you want to see the original files your project started with.
Edit the game information
When you tested the project, you probably started the game with 4 players, but Reversi is a game for exactly 2 players! If a table is currently open, close it using Express Stop. We don't want a 4-player table running when we restrict the game to 2 players.
Edit this line:
to specify that the game needs exactly 2 players, and edit this line: to limit player colors to black and white. This way, players can easily identify their disc color.You can also edit game_name. For a real game, we would fill in the other values too.
The game information is cached, so you may still be able to create a 4-player table for a few minutes. After that, you should only be able to create a 2-player table.
After testing our changes, it's a good idea to commit:
Set up the game states
Thinking about the rules in terms of a state machine, the basic flow is simple. A player places a disc, then the next player takes their turn. This repeats until the game ends. We will handle passing and the end conditions later.
So the game states would look like this:
flowchart TD
    gameSetup[gameSetup] -->|start game| PlayDisc[play disc]
    PlayDisc -->|play disc| NextPlayer[NextPlayer]
    NextPlayer -->|next turn| PlayDisc
    NextPlayer -->|end game| gameEnd[gameEnd]
In modules/php/States, there are already 3 states in the skeleton: PlayerTurn, NextPlayer and EndScore. It's almost what we want! EndScore isn't shown in the diagram, but it's a good habit to have a state for final scores and statistics, so we'll keep it.
Rename PlayerTurn to PlayDisc, in both the file name and the class name. After saving the renamed file, you should see Done PlayDisc.php in the VSCode status bar, meaning the file was uploaded.
The modules/php/Game.php file also references PlayerTurn as our first state. Update the references there too, and in NextPlayer.php.
Make the same replacement in modules/js/Game.js. The property with the state name starts with a lowercase letter, so keep it that way! Save the file and check for Done Game.js in the VSCode status bar. This also applies if you use TypeScript, as the automatic build of Game.js should trigger the upload.
Test our changes
Test your changes regularly to make sure we haven't broken anything. From the Manage Game page, go to Play, Create, then Express Start.
You may see this error: Invalid id for state class \Bga\Games\reversi<yournickname>\States\PlayDisc (already used by another state).

This happens because renaming the state locally doesn't delete PlayerTurn.php from the FTP folder. We now have 2 states with the same ID on the server!
Press Ctrl+Shift+P and run View: Show SFTP.
Open modules/php/States, right-click PlayerTurn.php, choose Delete and confirm.
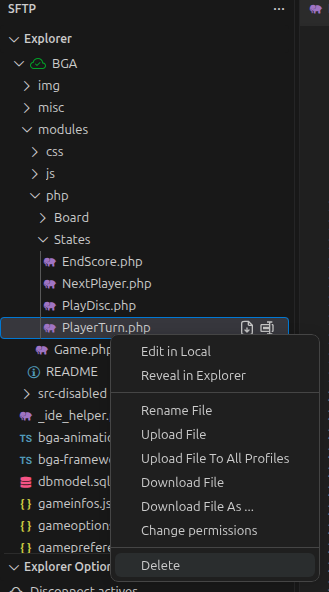
Try Express Start again. This time, it should work. Go to the game and keep it open for now.
Adapt the front-end state
The front-end example tells the player to play a card or pass, which doesn't match our game.
This text is set in the onEnteringState function, which is called every time we enter the state. The active player sees "You" instead of "[player name]". Let's change it to:
    onEnteringState(args, isCurrentPlayerActive) {
        this.bga.statusBar.setTitle(isCurrentPlayerActive ?
            _('${you} must play a disc') :
            _('${actplayer} must play a disc')
        );
    }
We will add a temporary action to simulate a turn and use it as the basis for the real action later. Replace the if (isCurrentPlayerActive) { example with this:
        if (isCurrentPlayerActive) {
            this.bga.statusBar.addActionButton(
                _('Play disc'),
                () => this.bga.actions.performAction("actPlayDisc", { x: 1, y: 2 }),
            );
        }

Let's look at the code we added:
- The first parameter,
_('Play disc'), is the button label. Wrapping it in_()marks it as translatable in BGA's translation system. Players using another language will see the translated label. - The second parameter is the callback triggered when the player clicks the button. Here, we call a game action named
actPlayDisc(all action names must start withact) and send it some parameters. For now, these are fixed example values.
If you click the button, you should see "This move is not authorized now". The back-end state defines which actions the front end can use, and we haven't added this action yet. Let's do that!
Adapt the back-end state
Delete the actPass function, which we won't use, then replace actPlayCard with this:
    #[PossibleAction]
    public function actPlayDisc(int $x, int $y, int $activePlayerNo)
    {
        throw new UserException("actPlayDisc called by player $activePlayerNo with x=$x y=$y");
        return NextPlayer::class;
    }
#[PossibleAction] attribute tells BGA that this action is allowed in the current state. Refresh to give the front end the updated list of actions, then click the button again. You should now see the exception.

The parameter names must match the ones sent in the performAction call so BGA can map them automatically. BGA also fills in int $activePlayerNo automatically, based on its name. This is the player's position in the turn order, starting at 1. The order is random, so it won't necessarily match the number in your account name.
Comment out the throw new UserException line. Now, clicking the button takes the game to the NextPlayer state. The return value of an action function tells the state machine which state to enter next.
The NextPlayer class gives extra time to a player to compensate for their action, activates the next player, then redirects to PlayDisc (or EndScore if the game is over). Nothing to change here.
Clicking the button now takes us to NextPlayer, which activates the next player and redirects to PlayDisc again. You can test this on Studio using the red arrows. For now, it's an endless loop, as our action does nothing and we haven't set an end condition yet.
Show the board
When you start a table, you see placeholders for player zones. In Reversi, both players use the same board, so we don't need separate zones. Let's display a board instead!
In the JS Game class, replace the blocks under // Example to add a div on the game area and // Setting up player boards with:
        this.bga.gameArea.getElement().insertAdjacentHTML('beforeend', `<div id="board"></div>`);

        // Dynamically generate board
        const board = document.getElementById('board');
        const board_size = 8;
        // Add cells row by row to match the grid's horizontal fill order.
        for (let y = 1; y <= board_size; y++) {
            for (let x = 1; x <= board_size; x++) {
                board.insertAdjacentHTML(`beforeend`, `<div id="square_${x}_${y}" data-x="${x}" data-y="${y}" class="square">SQUARE</div>`);
            }
        }
Let's add a bit of styling:
#board {
    position: relative;
    margin: auto;
    border: 20px solid black;
    background: black;
    display: grid;
    grid-template-columns: repeat(8, 1fr);
    gap: 2px;
    width: min-content;
}

.square {
    width: 58px;
    height: 58px;
    background-color: darkgreen;
    display: flex;
    justify-content: center;
    align-items: center;
}
SQUARE text from the square template. You should now see the board!
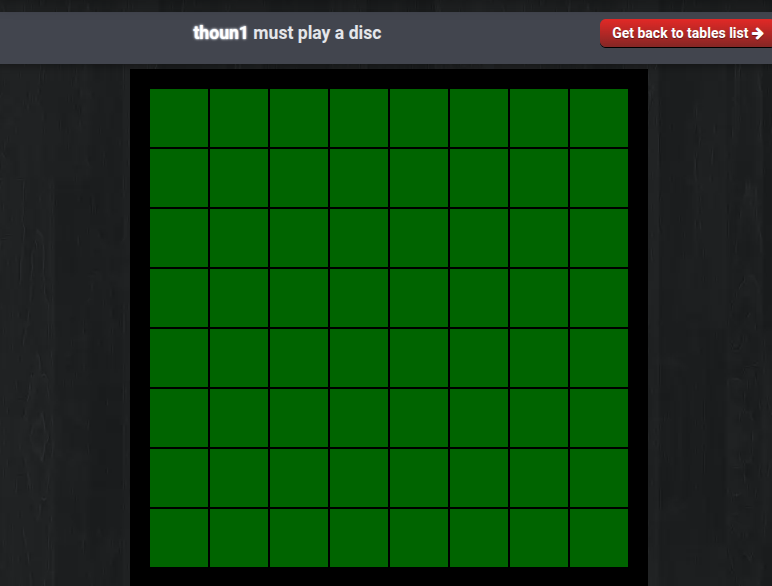
Connect the action to the board
Now that we have the squares, we don't need the temporary button. In the loop that adds the squares, add this after creating each square:
document.getElementById(`square_${x}_${y}`).addEventListener('click', () => this.bga.states.getCurrentMainStateClass().onPlayDisc?.(x, y));
PlayDisc class, replace the onCardClick function with:
    /**
     * When the player clicks on a square to play a disc.
     *
     * @param {number} x
     * @param {number} y
     */
    onPlayDisc(x, y) {
        this.bga.actions.performAction("actPlayDisc", { x, y });
    }
Remove the temporary button we added in onEnteringState and uncomment the exception in the PHP state class.
Refresh and click on a square. You should see the exception with the coordinates of the square you clicked.
Initial state of the game
The board is empty, but Reversi starts with 4 discs in the center. We will create them in the setupNewGame function of the PHP Game class. We will use BGA's ItemManager library, which lets you store and manage game items without writing SQL.
We are changing the game setup, so close your table with Express Stop if one is running. We'll start a new one after this step to check that the setup works as expected.
Even though the game is small, let's put the code for the board and its items in a separate class. This shows how to split up PHP code, and it's a good habit!
Create a Board folder in modules/php. Inside it, create this file:
<?php
declare(strict_types=1);
namespace Bga\Games\<your project name>\Board;

use \Bga\GameFramework\Components\ItemManager\Item;
use \Bga\GameFramework\Components\ItemManager\ItemField;
use \Bga\GameFramework\Components\ItemManager\ItemFieldKind;

#[Item]
class Disc {
    #[ItemField(kind: ItemFieldKind::ID)]
    public int $id;
    #[ItemField(kind: ItemFieldKind::LOCATION)]
    public string $location;
    #[ItemField(kind: ItemFieldKind::ORDER)]
    public int $order;

    #[ItemField]
    public int $side = 0; // 1 or 2, matching player no
    #[ItemField]
    public ?int $x = null; // coordinate, when the disc is placed
    #[ItemField]
    public ?int $y = null; // coordinate, when the disc is placed
}
?>
<your project name> with your project name.
This class describes a Disc item for the ItemManager. Each item has an ID, location and order. These fields are required by the ItemManager.
We also add our custom side field to store whether a disc belongs to player 1 or player 2 when placed on the board.
Now, create our board manager in the same folder:
<?php
declare(strict_types=1);

namespace Bga\Games\<your project name>\Board;

use Bga\GameFramework\Components\ItemManager\ItemManager;
use Bga\GameFramework\Components\ItemManager\ItemLocation;
use Bga\GameFramework\Helpers\Collection;
use Bga\Games\<your project name>\Game;

final class DiscLocation {
    public const RESERVE = 'reserve';
    public const BOARD = 'board';

    private function __construct() {}
}

class BoardManager {
    /** @var ItemManager<Disc> */
    public ItemManager $items;

    private \Bga\GameFramework\Bga $bga;

    function __construct(
        protected Game $game,
    ) {
        $this->bga = $game->bga;

        $this->items = $this->bga->itemManagerFactory->createItemManager(
            Disc::class,
            locations: [
                new ItemLocation(DiscLocation::RESERVE),
                new ItemLocation(DiscLocation::BOARD),
            ],
        );
    }

    /**
     * Create the table for the items, based on the item class #[Item].
     */
    public function initDb(): void {
        $this->items->initDb();
    }
}
This class sets up the ItemManager to use Disc as its item class, with 2 possible locations: reserve and board.
Now let's declare it and use it in the Game class.
class Game extends \Bga\GameFramework\Table {
    public BoardManager $boardManager;

    public function __construct() {
        parent::__construct();
        $this->boardManager = new BoardManager($this);
    }
$CARD_TYPES and $playerEnergy properties, both their declarations and their setup in the constructor. They are examples that we won't use in this tutorial.
Place your cursor just after public BoardManager, which is underlined in red, and press Ctrl+Space, then Enter. This adds the use line for you.
We don't need to require_once the BoardManager file, as it is loaded automatically.
Autoloader
For autoloading to work, we follow the PSR-4 standard. Your folder and file structure must match the namespace and class name, as shown in our example.
In the setupNewGame function, also replace the playerEnergy->initDb line with:
    protected function setupNewGame($players, $options = []) {
        $this->boardManager->initDb();
Now we need to create the discs during game setup:
    /**
     * Creates the 64 discs.
     */
    public function setup() {
        $discs = [
            ['location' => DiscLocation::RESERVE, 'item_nbr' => 64]
        ];

        $this->items->createItems($discs);

        $this->setInitialDiscs();
    }

    /**
     * Place the 4 initial discs.
     */
    private function setInitialDiscs() {
        for ($x = 4; $x <= 5; $x++) {
            for ($y = 4; $y <= 5; $y++) {
                // put a disc on the board to the central coordinate
                $disc = $this->items->pickItem(DiscLocation::RESERVE, DiscLocation::BOARD);
                $disc->side = $x === $y ? 1 : 2;
                $disc->x = $x;
                $disc->y = $y;
                $this->items->updateItem($disc);
            }
        }
    }
In the Game class, call this setup method by replacing // TODO: Setup the initial game situation here. with:
Start a new game to make sure everything works as expected.
If you kept $this->playerEnergy->fillResult($result); in getAllDatas, you may get an error. Remove it and try starting a new table again.
Explore the database
You won't see any changes in the game yet, as we have only set up the PHP side. You can inspect the database for this table by clicking Go to game database.
Log in with the credentials you received by email.
You'll see a Disc table created by the ItemManager from our item class name, with columns for all the #[ItemField] fields. Sort by location to find our 4 starting discs, with side, x and y set. These fields are null by default for the discs still in the reserve.
You can close the database tab and come back at any time to check that the data matches your expectations. You can also edit the values directly, but we will explore easier ways to change the game state later.
Send the discs to the front end
Create a function in BoardManager to return all discs currently on the board:
    /**
     * @return Collection<Disc>
     */
    public function getBoardDiscs(): Collection {
        return $this->items->getItemsInLocation(DiscLocation::BOARD);
    }
The Game class has a function called getAllDatas, which returns the data the front end needs to display the current game state. Send it the board data by replacing // TODO: Gather all information about current game situation (visible by player $currentPlayerId). with:
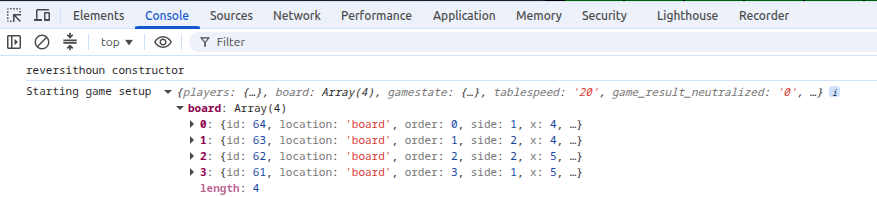
Open the Console tab in the DevTools (F12) and refresh the page. Expand the object on the Starting game setup line. You should see the board entry we added in getAllDatas, with the 4 items created during setup. Now we need to display them!
Display the discs

Download this file into your img directory. In VSCode, right-click it and choose Upload file to send it to the FTP server. Auto-upload handles files saved in VSCode, but files added outside the editor need to be uploaded manually.
We use a single sprite file for both disc images to reduce the number of image files.
Image or CSS
We built the board in pure CSS. We could do the same for the discs, but we use a WebP image here to show how to use images in a BGA project. When possible, prefer CSS to avoid loading extra image files. Real game artwork will often need images, though!
Style the discs in the CSS file
.disc {
    position: relative;
    width: 54px;
    height: 54px;
    z-index: 3;
    transform-style: preserve-3d;
}
.disc .disc-faces {
    transform-style: preserve-3d;
}
.disc[data-color="2"] .disc-faces {
    transform: rotateY(180deg);
}

.disc-face {
    position: absolute;
    width: 54px;
    height: 54px;
    background-image: url('img/discs.webp');
    background-size: auto 100%;
    backface-visibility: hidden;
}
.disc-face[data-side="1"] {
    background-position-x: 0%;
    transform: rotateY(0deg);
}
.disc-face[data-side="2"] {
    background-position-x: 100%;
    transform: rotateY(180deg);
}
With this CSS, we can set the disc color using a data attribute. This gives it a single value, so a disc cannot be both black and white. Each disc will contain a disc-faces div with 2 disc-face divs, one for each side. This will let us add a flip animation!
Add a disc utility method in the JS file
Now, let's make the discs sent by getAllDatas visible on the board.
Let's create a method in the JavaScript Game class to add a disc to the board. Add this under //// Utility methods:
    addDiscOnBoard(x, y, side) {
        const discId = `disc_${x}_${y}`;

        document.getElementById(`square_${x}_${y}`).insertAdjacentHTML('beforeend', `
            <div class="disc" data-side="${side}" id="${discId}">
                <div class="disc-faces">
                    <div class="disc-face" data-color="white"></div>
                    <div class="disc-face" data-color="black"></div>
                </div>
            </div>
        `);
    }
Now we will call this utility function in the setup function.
Update the setup type information to show that gamedatas.board contains an array of discs:
Finally, after generating the board, fill it with the discs listed in gamedatas.board:
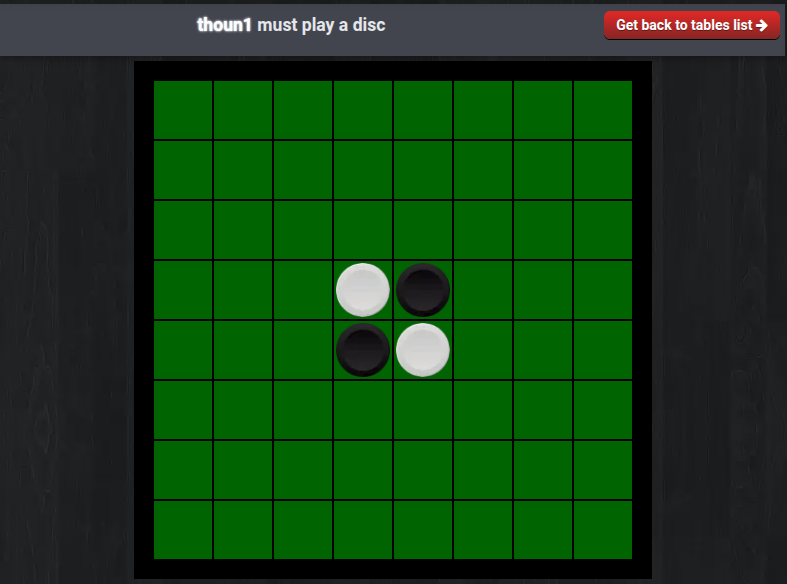
Refresh the page. You should see the 4 starting discs!
Display allowed moves
We will create a PHP function called getPossibleMoves to:
- Show the current player where they can play by returning a list of coordinates.
- Check whether the player can play on the square they choose.
Compute the possible moves
This is plain PHP code, with no specific BGA framework features. We won't go into the details here. Copy this method into BoardManager:
    /**
     * Get the discs that would be flipped by placing a disc at the given coordinates.
     *
     * @param int $x
     * @param int $y
     * @param 1|2 $side Disc side to place.
     * @param Collection<Disc> $board Discs currently on the board, keyed by disc ID.
     * @return Collection<Disc> Discs to flip, keyed by disc ID, or an empty collection if none.
     */
    public function getFlippedDiscs(int $x, int $y, int $side, Collection $board): Collection
    {
        if ($board->find(fn (Disc $disc) => $disc->x === $x && $disc->y === $y) !== null) {
            return new Collection();
        }

        $turnedOverDiscs = new Collection();
        $directions = [
            [-1, -1], [-1, 0], [-1, 1], [0, -1],
            [0, 1], [1, -1], [1, 0], [1, 1],
        ];

        foreach ($directions as [$dx, $dy]) {
            $currentX = $x + $dx;
            $currentY = $y + $dy;
            $opponentDiscs = new Collection();

            while ($currentX >= 1 && $currentX <= 8 && $currentY >= 1 && $currentY <= 8) {
                $disc = $board->find(fn (Disc $disc) => $disc->x === $currentX && $disc->y === $currentY);
                if ($disc === null) {
                    break;
                }

                if ($disc->side === $side) {
                    // Only flip a line of opposing discs closed by our own side.
                    $turnedOverDiscs = $turnedOverDiscs->merge($opponentDiscs);
                    break;
                }

                $opponentDiscs = $opponentDiscs->add($disc);
                $currentX += $dx;
                $currentY += $dy;
            }
        }

        return $turnedOverDiscs;
    }

    /**
     * Get the empty cells where the given side can place a disc and flip at least one opposing disc.
     *
     * @param 1|2 $side Disc side to place.
     * @return array<int, array{x: int, y: int}> Coordinates of the legal moves.
     */
    public function getPossibleMoves(int $side): array {
        $result = [];
        $board = $this->getBoardDiscs();

        for ($x = 1; $x <= 8; $x++) {
            for ($y = 1; $y <= 8; $y++) {
                $flipped = $this->getFlippedDiscs($x, $y, $side, $board);
                if (!$flipped->isEmpty()) { // valid move as it would flip some opponent discs
                    $result[] = ['x' => $x, 'y' => $y];
                }
            }
        }

        return $result;
    }
Send the possible moves to the front end
Replace the PlayDisc class's getArgs function with this one to send the active player's possible moves to the front end:
    public function getArgs(int $activePlayerNo): array {
        return [
            "possibleMoves" => $this->game->boardManager->getPossibleMoves($this->game->getPlayerDiscSide($activePlayerNo)),
        ];
    }
playerNo. Put it in the Game class, as it is not related to the board:
    public function getPlayerDiscSide(int $playerNo): int {
        return $this->getPlayerColorByNo($playerNo) === '000000' ? 2 : 1;
    }
In the JavaScript Game class, uncomment:
Refresh the page and expand the object on the onEnteringState PlayDisc line. You should see the arguments sent by getArgs, including the possible moves we computed.
Whenever possible, we do the calculations in PHP and keep the front end simple. The front end relies on the back end for the list of possible moves.
Display the possible moves
Add a style to highlight the selectable squares:
.square.selectable {
    background-color: color-mix(in srgb, darkgreen, white 50%);
    cursor: pointer;
}
Add JSDoc at the top of your file if you want type information in your code:
/**
* @typedef {Object} BoardPosition
* @property {number} x
* @property {number} y
*/

/**
* @typedef {Object} PlayDiscArgs
* @property {BoardPosition[]} possibleMoves
*/
Update the PlayDisc definition with this type information:
In PlayDisc.onEnteringState, add the class to the squares where the player can play:
PlayDisc.onLeavingState, clear the possible moves:
Now add updatePossibleMoves to the PlayDisc class:
    updatePossibleMoves(possibleMoves) {
        // Remove current possible moves
        document.querySelectorAll('.selectable').forEach(div => div.classList.remove('selectable'));

        possibleMoves.forEach(possibleMove =>
            // x,y is a possible move
            document.getElementById(`square_${possibleMove.x}_${possibleMove.y}`).classList.add('selectable')
        );
    }
Refresh the page to see the possible moves. Make sure you're on the active player's tab.
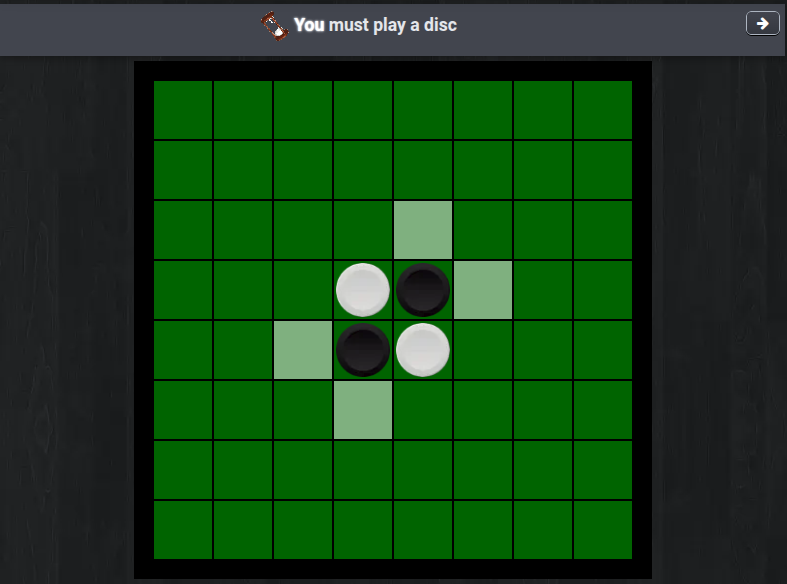
Also update onPlayDisc to ignore clicks on squares that are not selectable. There is no need to send an action to the back end if we already know it is invalid!
    onPlayDisc(x, y) {
        if (!this.args.possibleMoves.find(possibleMove => possibleMove.x === x && possibleMove.y === y)) {
            return;
        }
        this.bga.actions.performAction("actPlayDisc", { x, y });
    }
Save the played move
Update actPlayDisc to:
- Check that the move is valid. Never trust the front end, as a player can send a manually crafted request. Always check on the PHP side, even if the front end also checks.
- Save the placed disc and flip the surrounded discs.
- Later, notify the front end of the change.
- Later, update the scores.
We added array $args. Based on this name, BGA automatically fills it with the return value of getArgs.
#[PossibleAction]
    public function actPlayDisc(int $x, int $y, int $activePlayerNo, array $args) {
        // check if this is a possible move
        if (!array_any($args['possibleMoves'], fn($possibleMove) => $possibleMove['x'] === $x && $possibleMove['y'] === $y)) {
            throw new UserException(clienttranslate("Impossible move"));
        }

        $discSide = $this->game->getPlayerDiscSide($activePlayerNo);
        // Let's place a disc at x,y and return all "$returned" discs to the active player
        [$newDisc, $flippedDiscs] = $this->game->boardManager->playDisc($x, $y, $discSide);

        // Then, go to the next state
        return NextPlayer::class;
    }
Now we must implement the playDisc function:
    /**
     * Place a disc at the given coordinates and flip the captured opponent discs.
     *
     * @param int $x
     * @param int $y
     * @param 1|2 $side Disc side to place.
     * @return array{0: Disc, 1: Collection<Disc>} The placed disc and flipped discs, keyed by disc ID.
     */
    public function playDisc(int $x, int $y, int $side): array {
        // flip the existing discs
        $flippedDiscs = $this->game->boardManager->getFlippedDiscs($x, $y, $side, $this->getBoardDiscs());
        foreach ($flippedDiscs as &$flippedDisc) {
            $flippedDisc->side = $side;
        }
        $this->items->updateItems($flippedDiscs, ['side']);

        // place the new disc
        $disc = $this->items->pickItem(DiscLocation::RESERVE, DiscLocation::BOARD);
        $disc->side = $side;
        $disc->x = $x;
        $disc->y = $y;
        $this->items->updateItem($disc);

        return [$disc, $flippedDiscs];
    }
On the active player's tab, click a possible move. Nothing appears yet because we haven't notified the front end. Refresh the page to see the updated board.
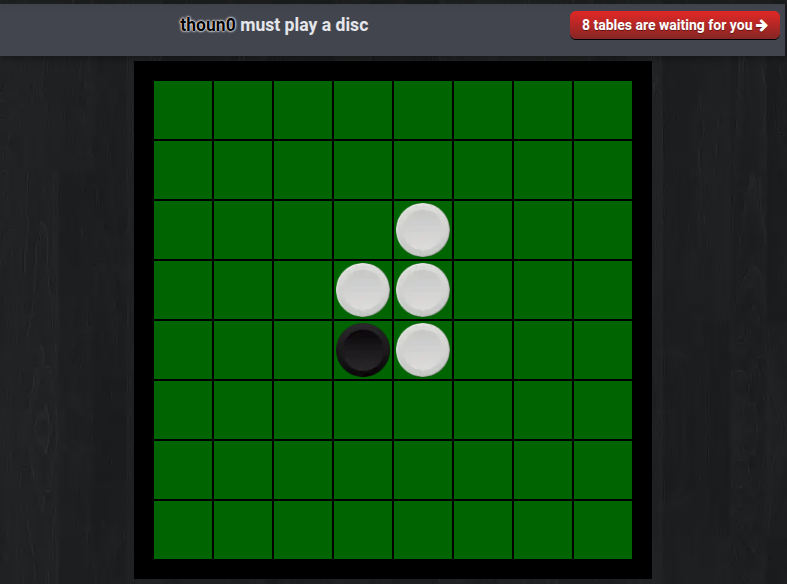
You can return to the situation before your move using Load previous state. You can also save a game situation in 3 different slots and load it at any time.

Update the zombie function
The zombie function is called when a player must make a move but has left the game. We usually play a random possible move so the game can continue.
    function zombie(int $playerNo, array $args) {
        $zombieChoice = $this->getRandomZombieChoice($args['possibleMoves']);
        return $this->actPlayDisc($zombieChoice['x'], $zombieChoice['y'], $playerNo, $args);
    }
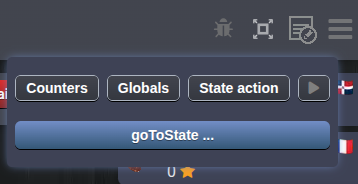
Save the current situation with Save 1. Open the debug menu at the top right, then click the arrow icon a few times. This plays a zombie move for the active player, so we can test without using the front-end actions. Refresh to see how the board has changed! Click Load 1 to return to the saved situation.
Display the played move
After the call to boardManager->playDisc, send a notification to all players. This lets the front end place the new disc and flip the captured discs:
        // Notify
        $this->bga->notify->all("playedDisc", clienttranslate('${player_name} plays a disc and flips ${flipped_count} disc(s)'), [
            'playerNo' => $activePlayerNo,
            'discSide' => $discSide,
            'x' => $x,
            'y' => $y,
            'flippedDiscs' => $flippedDiscs->map(fn($disc) => ['x' => $disc->x, 'y' => $disc->y])->values(),
            // only for logs
            'flipped_count' => $flippedDiscs->count(),
        ]);
If you click a possible move, you will see a playedDisc entry in the Input / Output section, but you will also get this error message:
Invalid or missing substitution argument for log message: ${player_name} plays a disc and flips ${flipped_count} disc(s): string.substitute could not find key "player_name" in template.
Use Load previous state to return to the situation before the error.
In the Game constructor (__construct), add:
    $this->bga->notify->addDecorator(function(string $message, array $args) {
        if (isset($args['playerNo']) && !isset($args['player_name']) && str_contains($message, '${player_name}')) {
            $args['player_name'] = $this->getPlayerNameByNo($args['playerNo']);
        }

        return $args;
    });
notify object to add player_name to the notification arguments when the message needs it and we have only sent playerNo. BGA finds the name from playerNo, so we do not have to send both values every time.
The player_name parameter
When BGA sees a notification argument with this name (optionally followed by a digit), it displays it in bold and in the player's color.
Try the action again. You should now see the notification message in the game log.

Remember, after a test you can return to the previous situation with Load previous state.
Show the new disc
Uncomment this line in modules/js/Game.js:
Then replace the commented-out notif_cardPlayed example with:
    async notif_playedDisc(args) {
        await this.addDiscOnBoard(args.x, args.y, args.discSide);
    }
async keyword lets the framework wait for one notification to finish before handling the next one. This keeps their animations from overlapping.
Add JSDoc if you want type information in your code:
/**
 * Place the played disc on the board and update the captured discs to its side.
 *
 * @param {Object} args Notification data sent by the playedDisc notification.
 * @param {number} args.playerNo Player who played the disc.
 * @param {1|2} args.discSide Side of the played and flipped discs.
 * @param {number} args.x Board column of the played disc (1–8).
 * @param {number} args.y Board row of the played disc (1–8).
 * @param {BoardPosition[]} args.flippedDiscs Coordinates of the captured discs.
 * @param {number} args.flipped_count Number of captured discs, used in the log.
 * @returns {Promise<void>}
 */
async notif_playedDisc(args)
This uses our existing addDiscOnBoard function to place a disc at the given coordinates. Try it! You should now see the disc appear without refreshing the page.
Using async and await makes the notification wait until the disc is fully added before unlocking the BGA interface and allowing the next move.
Let's add an animation to make this more lively!
Change the addDiscOnBoard signature to accept an optional element as the starting point for the animation:
Add JSDoc if you want type information in your code:
Update the notification handler so the disc animates from the panel of the player who placed it:
await this.addDiscOnBoard(args.x, args.y, args.discSide, this.bga.playerPanels.getElementByNo(args.playerNo));
At the end of addDiscOnBoard, add this to animate the disc:
    if (fromElement) {
        const element = document.getElementById(discId);
        await this.animationManager.fadeIn(element, fromElement);
    }
This uses the bga-animations library, which we need to set up.
At the very top of the Game.js file, add:
Download the d.ts file from the BgaAnimations documentation to your project root.
Uncomment the lines related to BgaAnimations in libs.ts, then add import { BgaAnimations } from "./libs"; at the start of Game.ts.
This tells BGA to wait for version 1.x of the library to load before continuing to load the game.
At the start of the Game setup function, create the animation manager:
        this.animationManager = new BgaAnimations.Manager({
            animationsActive: () => this.bga.gameui.bgaAnimationsActive(),
        });
Refresh and try the action again. You should now see the disc fading in from the player panel!
Show the flipped discs
Add this to your CSS to highlight the squares containing flipped discs:
.square {
    /*...*/
    transition: background-color 0.25s;
}
.square.flip-animation {
    background-color: rgb(125, 189, 125);
}
Add this function to animate the flipped discs using the animation manager:
    /**
     * Flips a disc with an animation.
     *
     * @param {BoardPosition} disc
     * @param {1|2} side
     */
    async animateFlippedDisc(disc, side) {
        const squareDiv = document.getElementById(`square_${disc.x}_${disc.y}`);
        const discDiv = document.getElementById(`disc_${disc.x}_${disc.y}`);

        squareDiv.classList.add('flip-animation');
        await this.bga.gameui.wait(500); // for the flip animation to finish


        discDiv.dataset.side = `${side}`;

        const parallelAnimations = [{
            keyframes: [ // flip the disc
                { transform: `rotateY(180deg)` },
                { transform: `rotateY(0deg)` },
            ]
        }, {
            keyframes: [ // lift the disc
                { transform: `translate(0, -12px) scale(1.2)`, offset: 0.5 },
            ]
        }];

        await this.animationManager.slideAndAttach(discDiv, squareDiv, { duration: 1000, parallelAnimations });

        squareDiv.classList.remove('flip-animation');
        await this.bga.gameui.wait(500); // for the flip animation removal to finish
    }
In the notif_playedDisc function, add this at the end:
        await Promise.all(
            args.flippedDiscs.map(flippedDisc =>
                this.animateFlippedDisc(flippedDisc, args.discSide)
            )
        );
We first place the new disc and wait for its animation to finish. Then we flip all captured discs at the same time and wait for those animations to finish before completing the notification. Refresh and try again to see how await makes the animations run in order.
Update the score
We will update the score in each player panel whenever a disc is played, using the predefined bga->playerScore PlayerCounter.
In the Game constructor (__construct), add:
playerScore counter to use playerNo instead of playerId.
In setupNewGame, set the initial score to 2 to match the starting discs:
After sending the playedDisc notification in actPlayDisc, update the scores by counting each player's discs on the board. We need to update both players' scores, as each move flips some of the opponent's discs.
        // Update scores according to the number of disc on board
        $board = $this->game->boardManager->getBoardDiscs();
        foreach ($this->game->loadPlayersBasicInfos() as $player) {
            $playerNo = (int)$player['player_no'];
            $playerDiscSide = $this->game->getPlayerDiscSide($playerNo);
            $playerDiscCount = $board->count(fn($disc) => $disc->side === $playerDiscSide);
            $this->bga->playerScore->set($playerNo, $playerDiscCount); // this will update the JS counter automatically
        }
Play a move to see the scores update in the player panels after the disc animations.
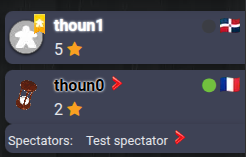
BGA uses the score in bga->playerScore to determine the winner automatically. Some games also use a tie-breaker value in bga->playerScoreAux, but Reversi doesn't need one.
Implement the game progression
The BGA framework expects getGameProgression to return the progress of the game as a number from 0 to 100.
Update the existing function:
    public function getGameProgression() {
        return (int)round($this->boardManager->getBoardDiscs()->count() / 64 * 100);
    }
We also need to tell the framework when to update game progression. The NextPlayer class already has the updateGameProgression flag enabled, so progression is updated whenever the active player changes. This happens after each move, which is what we want. Nothing else to change!
Add some statistics
Replace the contents of stats.jsonc with:
{
  "table": [],
  "player": {
    "discPlayedOnCorner": {
      "id": 10,
      "name": "Discs played on a corner",
      "type": "int"
    },
    "discPlayedOnBorder": {
      "id": 11,
      "name": "Discs played on a border",
      "type": "int"
    },
    "discPlayedOnCenter": {
      "id": 12,
      "name": "Discs played in the center of the board",
      "type": "int"
    },
    "flippedDiscs": {
      "id": 13,
      "name": "Number of flipped discs",
      "type": "int"
    }
  }
}
In setupNewGame, replace the placeholder comment // Init game statistics. with:
$this->playerStats->init(['discPlayedOnCorner', 'discPlayedOnBorder', 'discPlayedOnCenter', 'flippedDiscs'], 0);
In actPlayDisc, update the statistics after the playDisc call:
        $this->bga->playerStats->inc('flippedDiscs', $flippedDiscs->count(), $this->game->getPlayerIdByNo($activePlayerNo));

        $updatedStat = 'discPlayedOnCenter';
        if(($x === 1 && $y === 1) || ($x === 8 && $y === 1) || ($x === 1 && $y === 8) || ($x === 8 && $y === 8)) {
            $updatedStat = 'discPlayedOnCorner';
        } else if ($x === 1 || $x === 8 || $y === 1 || $y === 8) {
            $updatedStat = 'discPlayedOnBorder';
        }
        $this->bga->playerStats->inc($updatedStat, 1, $this->game->getPlayerIdByNo($activePlayerNo));
To test the statistics, make a few moves manually or use the Play/arrow button in the debug menu.
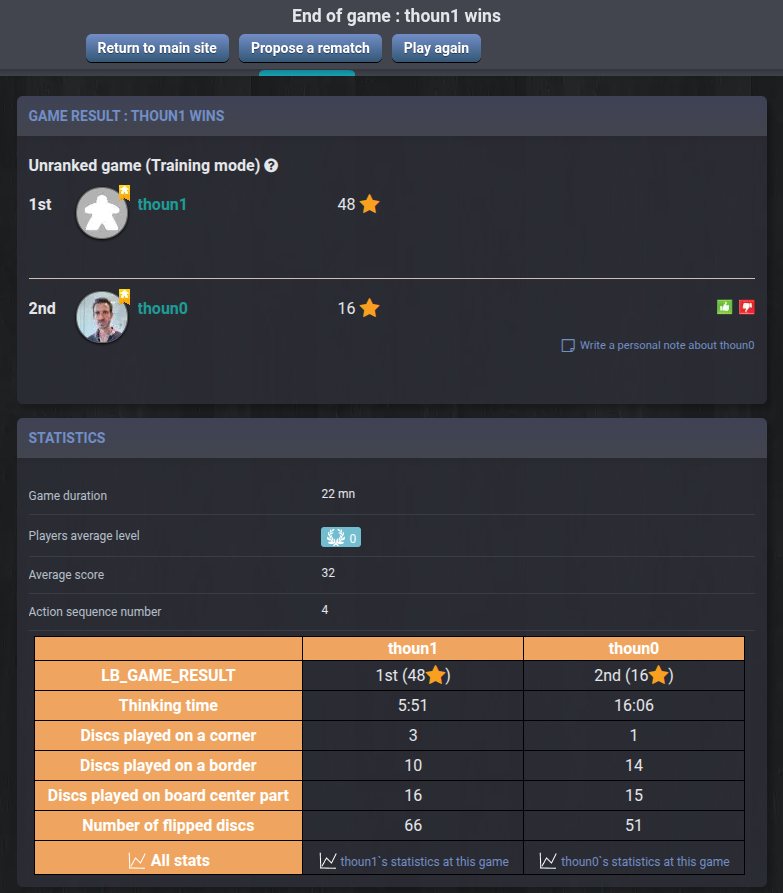
Then click goToState in the debug menu, select EndScore and click Apply. This takes the game to EndScore, which redirects to the game end and marks the table as complete.
In the Statistics section of the game results, you should see values for the statistics we added.
The debug_ functions
The goToState entry appears in the debug menu because we have a debug_goToState function in the PHP Game class. You can create as many debug functions as you like! See some examples.
Handle game end
Currently, NextPlayer always redirects to PlayDisc. We need to set $gameEnd to true when the game is over, and skip a player's turn when only their opponent can play:
    /**
     * Advance to the next player, passing their turn or ending the game when necessary.
     */
    function onEnteringState() {
        $activePlayerId = (int) $this->game->activeNextPlayer();
        $this->game->giveExtraTime($activePlayerId);

        $activePlayerNo = (int) $this->game->getPlayerNoById($activePlayerId);
        $side = $this->game->getPlayerDiscSide($activePlayerNo);
        $board = $this->game->boardManager->getBoardDiscs();

        // A full board or a player with no discs ends the game immediately.
        $gameEnd = $board->count() === 64 || $board->find(fn ($disc) => $disc->side === $side) === null;
        if (!$gameEnd && empty($this->game->boardManager->getPossibleMoves($side))) {
            $opponentSide = 3 - $side;
            $gameEnd = empty($this->game->boardManager->getPossibleMoves($opponentSide));
            if (!$gameEnd) {
                // Only the opponent can play, so pass this player's turn.
                return NextPlayer::class;
            }
        }

        if ($gameEnd) {
            return EndScore::class;
        }

        return PlayDisc::class;
    }
To test the end of the game, right-click the Play/arrow debug button and set it to 64 moves. You can watch the game play itself, or refresh to skip the animations and check that the game ended with a winner.
Optional: add unit tests
Follow the PHP testing instructions to set up PHPUnit and create the Reversi unit tests provided as examples.
Run phpunit. All 4 tests should pass! This gives us some confidence that a full board is handled correctly without having to play a whole game :)
After the tutorial
If you want, you can also do the Hearts tutorial
Or continue with Before starting a real project